
[ad_1]
With a dependable token allowance checker, you’ll be able to see all open approvals associated to any ERC-20 token for any pockets tackle. For those who’d wish to construct such a checker, now you can simply achieve this, due to the Moralis Token API. You solely want a easy backend script (you should use NodeJS) and a React frontend. As such, you’ll be able to construct a token allowance checker dapp (decentralized utility) in minutes. Right here’s the core methodology of viewing pockets token approvals:
const response = await Moralis.EvmApi.token.getTokenAllowance(choices);
For those who want to learn to correctly implement the getTokenAllowance Token API endpoint utilizing NodeJS, then the tutorial under is strictly what you want. In fact, in case you want movies, you should use the one on the high, as it is going to additionally get you to the end line. Whichever path you select, you’ll study all of the necessities to create a token allowance checker. What’s extra, you’ll want to have a Moralis Web3 API key to perform this process. Due to this fact, don’t neglect to enroll with Moralis earlier than getting your arms soiled!

Overview
Most of you’re in all probability desperate to learn to use the “get ERC-20 token allowance” (getTokenAllowance) endpoint with JavaScript (JS). As such, we’ll dive proper into the “token allowance checker” tutorial within the subsequent part. There, we’ll present you create a easy JS script that implements the above-presented code snippet. This would be the backend of your token allowance checker dapp. Alongside the way in which, we’ll additionally present you set up the Moralis SDK and acquire your Web3 API key. Plus, we’ll undergo the getTokenAllowance endpoint documentation web page.
We’ll additionally guarantee you’ll be able to confidently reply the “what’s a token allowance checker?” query. To make sure that, we’ll do a demo of our instance dapp, which seems to be for pockets token approvals. By taking a look at our instance frontend and DEX approval examples, you’ll perceive the information that the endpoint returns higher. It’s going to additionally present you {that a} quite simple React app can do the trick and probably encourage you to create your individual frontend.
Tutorial: Construct a Token Allowance Checker
Observe: For those who really feel like you’ll want to get a greater understanding first of what token allowance is and the way DEXs ask on your approval earlier than constructing your NodeJS backend, take a look at the demo under the tutorial.
This tutorial focuses on utilizing NodeJS. Nonetheless, since Moralis is cross-platform interoperable, you too can use Python or different main programming languages and frameworks to construct dapps (decentralized purposes). With that in thoughts, first, just remember to have NodeJS v.14 or greater put in in your machine. You’ll additionally want a package deal supervisor, so you must set up npm or yarn as nicely. With these conditions underneath your belt, you’ll be able to transfer to step one.
Step 1: Set Up Moralis
In case you haven’t completed so but, create your Moralis account. You can begin with a free account; nonetheless, in case you plan on constructing dapps with a number of visitors, we advocate getting the Moralis Professional, Enterprise, or Enterprise plans. Upon getting your Moralis account up and operating, you’ll be able to entry your admin space. From there, you’ll have the ability to copy your Web3 API key with the next two clicks:
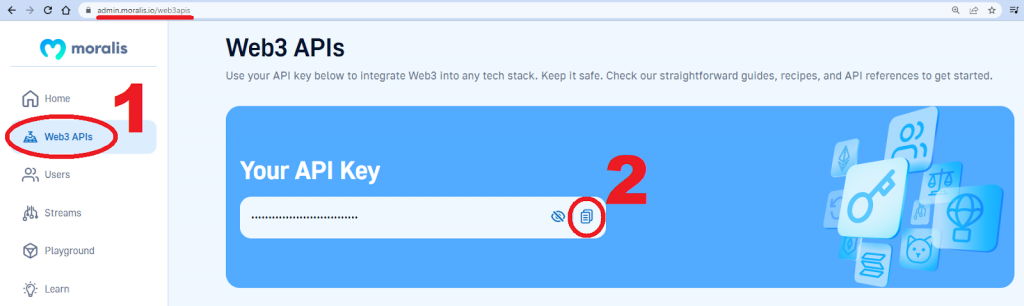
Observe: Maintain on to your API key for now – you’ll get to stick it into the script as we transfer ahead.
Subsequent, you’ll want to set up the Moralis SDK. The next command will handle that:
npm set up moralis @moralisweb3/common-evm-utilsyarn add moralis @moralisweb3/common-evm-utils
Step 2: Getting the Spender Allowance of ERC-20 Tokens
By this level, you already know that we’ll be utilizing the getTokenAllowance endpoint. That stated, you’ll want to get acquainted with this endpoint higher. So, let’s collectively take a look at a related API reference documentation web page:
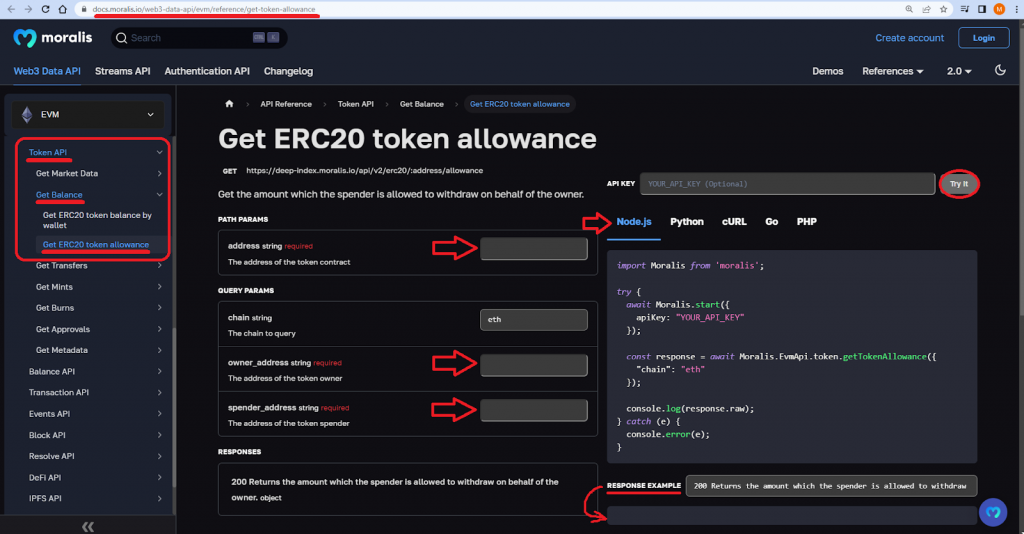
Wanting on the above screenshot, you’ll be able to see that the endpoint in query belongs to the “Get Steadiness” group of the Token API. The above picture illustrates the overall construction of all Moralis API reference pages. As you’ll be able to see, they assist you to choose the programming language/framework that you just need to use and execute the code through the “Attempt It” button. Nonetheless, earlier than you are able to do that, you’ll want to enter the required parameters. So, relating to constructing a token allowance checker with Moralis, these are the required parameters:
tackle – The tackle of the token contract.owner_address – The tackle of the token proprietor (this can be a pockets tackle that gave approval to the DEX). spender_address – The tackle of the token spender.
Observe: In additional superior situations, you need to examine totally different spender and token addresses. Therefore, all the above parameters can come within the type of arrays of strings.

Other than the above-presented required parameters, the getTokenAllowance endpoint additionally gives an choice to question different supported chains. By default, Ethereum is the focused chain; nonetheless, due to Moralis’ cross-chain interoperability, you get to decide on amongst all of the main EVM-compatible chains and their testnets:

For those who appeared on the above documentation web page fastidiously, you could have seen the field with the strains of code. The code on this field matches the programming language/framework you choose. Accordingly, you’ll be able to merely copy these strains into your code editor to create your backend scripts with minimal effort.
An Instance NodeJS Script
On the high of our instance script, we first import Moralis and evm-utils:
const Moralis = require(“moralis”).default;
const { EvmChain } = require(“@moralisweb3/common-evm-utils”);
Then, we initialize Moralis:
const runApp = async () => {
await Moralis.begin({
apiKey: “YOUR_API_KEY”,
});
Wanting on the strains of code above, you’ll be able to see that that is the place to stick your Web3 API key. Merely change the YOUR_API_KEY placeholder with the above-obtained API key. Subsequent, you need to outline the parameters that can go into the getTokenAllowance endpoint. For the sake of this straightforward tutorial, we’re utilizing a single tackle for every parameter – that’s, for tackle, owner_address, and spender_address:
const chain = EvmChain.ETHEREUM;
const tackle = “0x514910771AF9Ca656af840dff83E8264EcF986CA”;
const ownerAddress = “0x7c470D1633711E4b77c8397EBd1dF4095A9e9E02”;
const spenderAddress = “0xed33259a056f4fb449ffb7b7e2ecb43a9b5685bf”;
Lastly, we get to implement the road of code from the intro, together with the above parameters. Plus, we console-log the response and execute the runApp operate:
const response = await Moralis.EvmApi.token.getTokenAllowance({
tackle,
chain,
ownerAddress,
spenderAddress,
});
console.log(response.toJSON());
};
runApp();
Nonetheless, right here’s the entire instance script:
const Moralis = require(“moralis”).default;
const { EvmChain } = require(“@moralisweb3/common-evm-utils”);
const runApp = async () => {
await Moralis.begin({
apiKey: “YOUR_API_KEY”,
// …and some other configuration
});
const chain = EvmChain.ETHEREUM;
const tackle = “0x514910771AF9Ca656af840dff83E8264EcF986CA”;
const ownerAddress = “0x7c470D1633711E4b77c8397EBd1dF4095A9e9E02”;
const spenderAddress = “0xed33259a056f4fb449ffb7b7e2ecb43a9b5685bf”;
const response = await Moralis.EvmApi.token.getTokenAllowance({
tackle,
chain,
ownerAddress,
spenderAddress,
});
console.log(response.toJSON());
};
runApp();
Step 3: Run the Script
The above script is your token allowance checker, which now you can run with the next command:
node index.js
For the addresses used within the above script, the token allowance checker lets us know there aren’t any open pockets token approvals. So, that is the JSON response that you must see in your terminal:
{
“allowance”: “0”
}
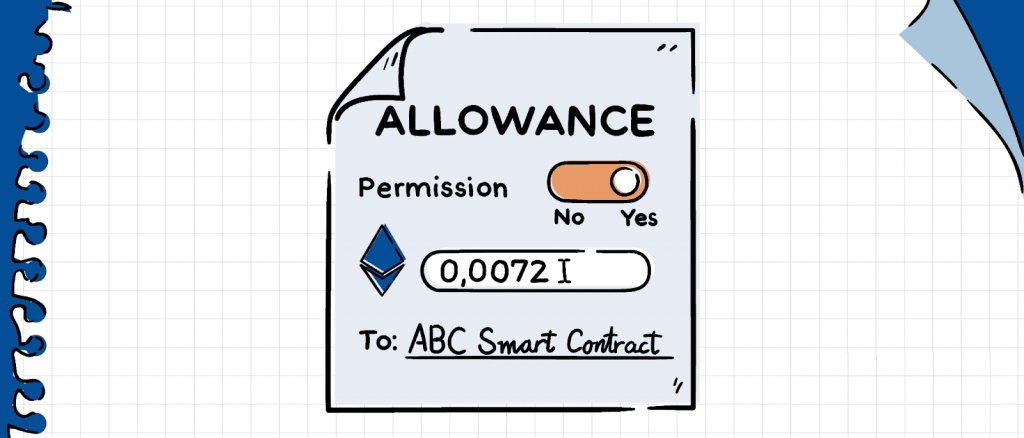
What’s a Token Allowance Checker?
A token allowance checker is a instrument (a script or a Web3 app/dapp) that reveals all approvals for ERC-20 tokens belonging to a particular pockets. In some circumstances, it will probably additionally allow you to management or change open allowances. Moreover, these approvals are assigned to particular sensible contracts, corresponding to those powering DEXs or aggregators. That can assist you higher perceive this, let’s do a easy demonstration.
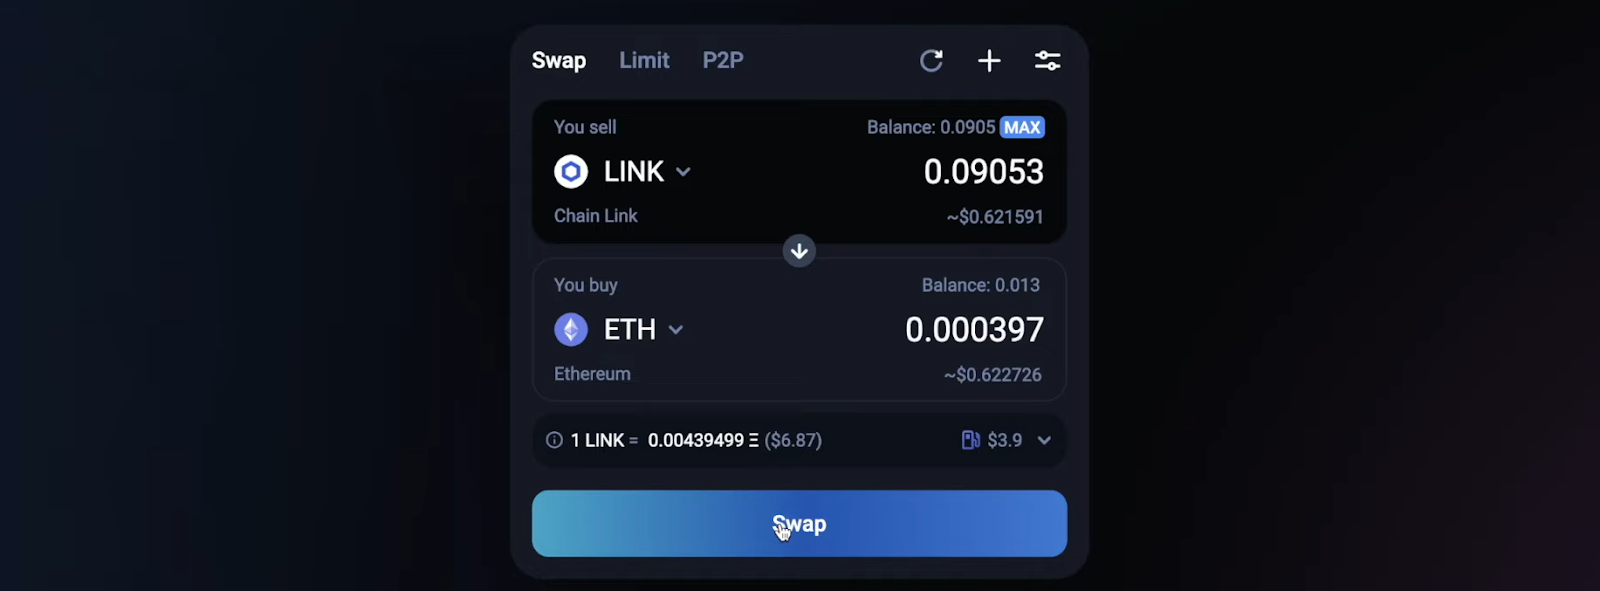
With our instance MetaMask pockets that holds a number of ERC-20 tokens (LINK, USDT, USDC, and UNI), we go to the 1inch aggregator. Once we join with our pockets and choose any of the tokens we maintain, we first want to present 1inch the token approval earlier than we will really swap them. Right here’s an instance for USDT:

Wanting on the above screenshot, you’ll be able to see the “lock” icon. The latter signifies that we haven’t but permitted a token allowance for that asset. Nonetheless, for the sake of this demonstration, we went on and gave 1inch approvals for LINK, USDT, and USDC. So, as soon as a token allowance has been permitted, there’s no “lock” icon, and we will swap our tokens:
Let’s additionally go to Uniswap and approve our UNI token there:

So, above, we gave token approvals to 1inch for LINK, USDT, and USDC tokens and to Uniswap for UNI. With that in thoughts, let’s take a look at our instance token allowance checker dapp that we constructed utilizing the getTokenAllowance endpoint from the above tutorial:

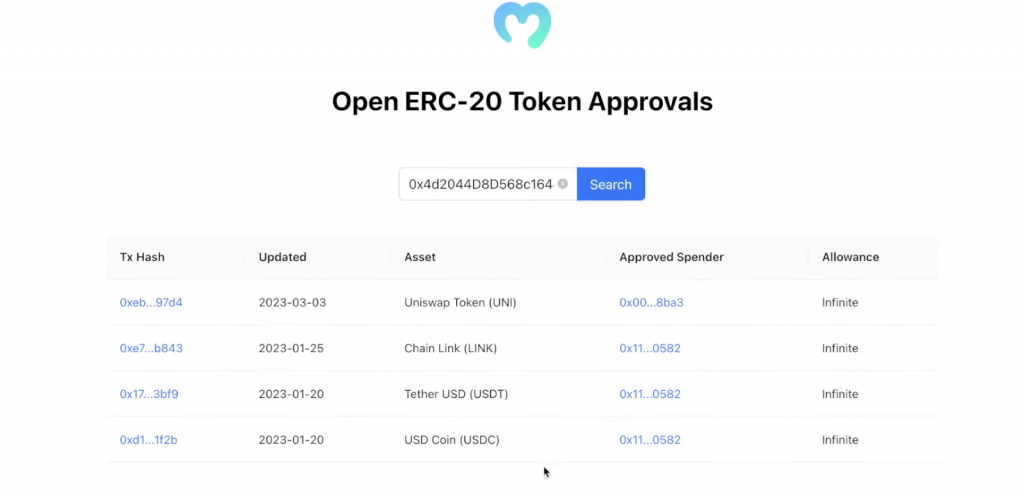
As indicated within the above picture, we first copy our MetaMask pockets tackle that holds the permitted tokens and paste it into the designated discipline of our React dapp. After hitting the “Search” button, our dapp shows all of the energetic token approvals:
Further Clarification of Concerned Parameters
Wanting on the above screenshot, you’ll be able to see that our token allowance checker additionally shows some particulars concerning the energetic token approvals. These particulars embrace the allowance transaction hash, time of approval, property in query, permitted spender’s tackle, and quantity of allowance. You may see that LINK, USDT, and USDC all have the identical “Authorized Spender” tackle. That’s as a result of we gave the 1inchs aggregator allowance approvals for these property. As for the UNI token, the permitted spender is Uniswap’s pockets tackle.
To make sure that you correctly perceive how we bought from the “get ERC20 token allowance” endpoint to the above particulars, let’s take a look at the above-displayed addresses from the endpoint parameters’ perspective. The entry discipline takes a pockets tackle and passes it to our backend, which assigns it to ownerAddress. We additionally geared up our instance dapp with strains of code that discover the related pockets tackle and create an array of token contract addresses owned by this pockets. These token contract addresses are assigned to the tackle parameter. As for the spenderAddress parameter, we created a JSON file that shops the addresses of all the favored DEXs. Thus, we coated all of the required parameters whereas specializing in the Ethereum chain.
Our Backend Response
Our backend’s Categorical server is operating on “localhost:3001”. Let’s take a look at its response for additional clarification:
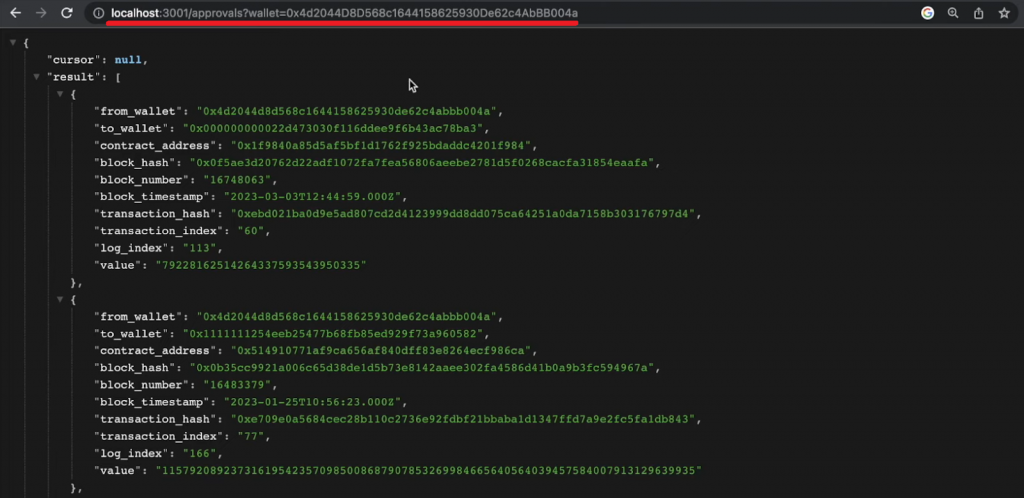
Wanting on the above screenshot, you’ll be able to see that we additionally created the /approvals endpoint that shows responses. So, from_wallet is our MetaMask tackle that holds LINK, USDT, USDC, and UNI tokens. Additionally, this parameter is similar for all responses. Subsequent, we’ve to_wallet representing a DEX’s pockets tackle – the spenderAddress parameter. Plus, contract_address represents an ERC-20 token’s sensible contract tackle. This covers the enter parameters.
The remainder of the responses are on-chain data associated to the approval transaction that the getTokenAllowance endpoint returns. These embrace a block hash, block quantity, block timestamp, transaction hash, transaction index, log index, and worth of the permitted allowance. So, we use these particulars to populate our frontend as offered above.
Now that you already know what a token allowance checker is and the way it works, we urge you to improve the above primary backend script accordingly and create your distinctive frontend round it. As well as, be at liberty to incorporate different highly effective Moralis Web3 API endpoints. In any case, now that you’ve your Moralis API key, they’re all at your disposal.

Token Allowance Checker – View Pockets Token Approvals – Abstract
Right now’s article taught you examine any pockets’s token approvals with a brief code snippet. As such, you met the getTokenAllowance endpoint. The latter takes on three totally different addresses (token proprietor, token spender, and token sensible contract) and, in return, tells you whether or not or not there are any open token approvals for a pockets tackle in query. Plus, in case there are some open token approvals, the endpoint additionally gives allowance particulars. Moreover, you had a chance to observe our lead and create a easy NodeJS script which will function a token allowance checker.
To even higher perceive at this time’s subject, we did an illustration of our instance dapp (decentralized utility) that permits you to view pockets token approvals. So, by overlaying the above sections, you must have a correct understanding of profit from the on-chain knowledge associated to token allowances.
You additionally realized that along with your Web3 API key, you should use many different Moralis Web3 Information API endpoints. Plus, you’ll be able to depend on the Moralis Auth API to cowl Web3 authentication. Additionally, utilizing the Moralis Streams API, you’ll be able to create real-time notifications primarily based on on-chain occasions.
For those who already know the fundamentals of Web3 improvement, you’ll be able to dive into the Moralis docs and begin BUIDLing. Nonetheless, you might want some steering, inspiration, or extra data about blockchain improvement. In that case, be sure that to go to the Moralis YouTube channel and the Moralis weblog. A few of the newest matters there concentrate on Alchemy’s Notify Customized Webhooks, how and the place to purchase an ENS area, get real-time crypto pockets stability updates, what’s an xNFT (executable NFT), constructing a crypto dashboard undertaking, create a blockchain explorer, and far more.
[ad_2]
Source link
.gif?format=1500w)
.gif?format=1500w)
