
[ad_1]
With the getNativeBalances endpoint from the Moralis Streams API, you may monitor a Web3 pockets (or wallets) and detect any on-chain exercise. On the identical time, you will get real-time pockets stability updates. The getNativeBalances endpoint enabling you to get the real-time stability of a pockets takes in selectors and sort:
getNativeBalances: [
{
selectors: [“$to”],
sort: ‘erc20transfer’
}
]
In fact, it’s essential to implement the above code snippet appropriately to make it work. Which means it’s essential to add the snippet to different choices of your Web3 stream inside your backend script. With all of the choices in place, you get to create your stream with the next line of code:
const newStream = await Moralis.Streams.add(choices)
Should you want to learn to implement the “Get Native Balances” endpoint, full our tutorial under. In it, we’ll present you the best way to create a easy JS script that detects ERC-20 token transfers. Plus, because of the endpoint, the script additionally will get the real-time pockets stability of the native cryptocurrency. If that sounds attention-grabbing, enroll with Moralis and comply with our lead!

Overview
In at present’s article, you’ll have a possibility to create a easy NodeJS dapp that detects ERC-20 token transfers on the Polygon Mumbai testnet. As we transfer ahead, we’ll full a number of steps and substeps:
PrerequisitesInitialize a NodeJS applicationSet up an Categorical serverFetch native real-time pockets stability and transferred ERC-20 tokens This step incorporates a number of substeps Run and Take a look at Your Backend Dapp
The ERC-20 token instance we’ll concentrate on on this article is LINK. Nonetheless, since Moralis is all about cross-chain interoperability, you should utilize the very same precept on Ethereum and different well-liked EVM-compatible testnets and mainnets.
Our NodeJS dapp will detect transfers of LINK tokens and return a message within the terminal as a response. That message will inform us which deal with acquired the ERC-20 tokens and what number of. Plus, the message will present us with the acquirer deal with’ native real-time pockets stability. Within the case of Mumbai, the native forex is “testnet” MATIC.
In case you are unsure why real-time pockets balances matter, we even have an additional part under the tutorial addressing that matter. As well as, you can too study extra concerning the Moralis Streams API and different highly effective instruments that Moralis affords.
Tutorial: Get Actual-Time Pockets Stability Whereas Monitoring ERC-20 Transfers
To finish this tutorial, it’s essential to full a number of steps. So, to begin, let’s have a look at the required stipulations!
Stipulations
A Moralis accountVisual Studio Code (VSC) or some other code editor of your choiceNodeJS (set up NodeJS and npm)

With the above stipulations below your belt, you’re able to create your NodeJS dapp.
Initialize a NodeJS Software
First, create a brand new mission – be happy to comply with our lead and name it “GetNativeBalances”. Subsequent, open that mission in VSC. Inside that listing, create one other folder: “webhook”. Then, use VSC’s terminal to initialize a brand new mission by coming into the next command:
npm init
Contained in the terminal, you’ll be requested to provide your mission a reputation and to arrange a number of choices. Be at liberty to stay to the default choices by merely urgent “enter” a number of instances. Consequently, you must see a “bundle.json” file in your mission tree. The script incorporates the next traces by default:
{
“title”: “simple-nodejs-demo”,
“model”: “1.0.0”,
“description”: “”,
“predominant”: “index.js”,
“scripts”: {
“check”: “echo “Error: no check specified” && exit 1″
},
“writer”: “”,
“license”: “ISC”
}
Earlier than you may proceed to arrange an Categorical server, you also needs to set up the required dependencies. To do that, run the next command:
npm set up moralis categorical @moralisweb3/common-evm-utils cors dotenv
Set Up an Categorical Server
Inside the “webhook” folder, create a brand new “index.js” file. You need this file to characterize an Categorical server and a webhook endpoint, which you’ll be able to name /webhook. Begin by requiring Categorical and CORS and defining native port:
const categorical = require(“categorical”);
const app = categorical();
const port = 3000;
const cors = require(“cors”);
With the above traces of code in place, you’re able to create the /webhook endpoint. We would like our dapp to console-log the native real-time pockets stability and the quantity of ERC-20 tokens transferred. So, we’ll create a separate NodeJS dapp to fetch these particulars. Nonetheless, this “index.js” script will guarantee the small print are correctly console-logged. So, these are the traces of code that may deal with that:
app.publish(“/webhook”, async (req, res) => {
const {physique} = req;
strive {
let quantity = Quantity(physique.erc20Transfers[0].valueWithDecimals)
let token = physique.erc20Transfers[0].tokenSymbol
let to = physique.erc20Transfers[0].to
let matic = Quantity(physique.nativeBalances[0].balanceWithDecimals)
console.log(“——————————————–“)
console.log(to + ” with MATIC Stability of ” + matic.toFixed(2));
console.log(“Aquired ” + quantity.toFixed(2) + token);
console.log(“——————————————–“)
} catch (e) {
console.log(e);
return res.standing(400).json();
}
return res.standing(200).json();
});
app.pay attention(port, () => {
console.log(`Listening to streams`);
});
Lastly, run your webhook by coming into the next command:
node index.js
Observe: The above script will fetch the information from our “stream.js” script, and it’ll return some errors earlier than you create and run that script.

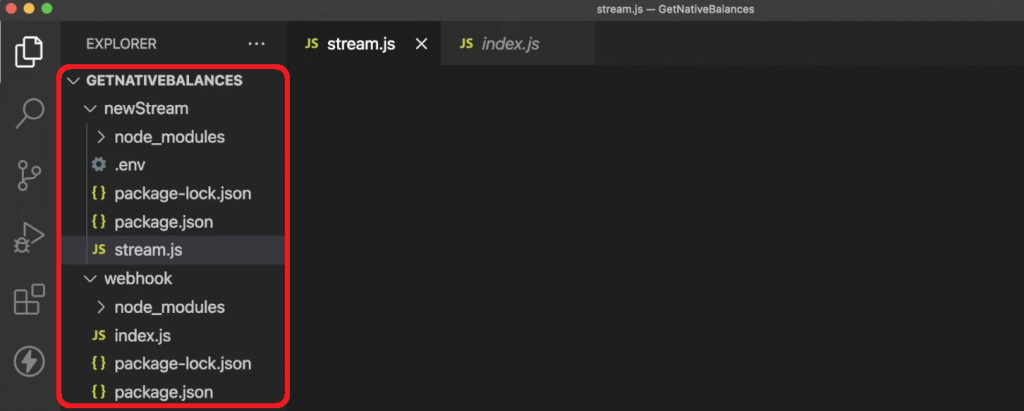
Fetch Native Actual-Time Pockets Stability and Transferred ERC-20 Tokens
Inside your mission listing, create one other folder: “newStream”. Whereas inside that folder, comply with the steps outlined within the “Initialize a NodeJS Software” part above to create one other NodeJS dapp. To keep away from confusion, we suggest you title the primary script “stream.js“. Except for this file, which will likely be our predominant focus transferring on, you additionally have to create a “.env” file. All in all, at this level, your “GetNativeBalances” mission tree ought to seem like this:
Acquire Your Moralis Web3 API Key
In case you haven’t created your Moralis account but, be sure to take action now. You will have your account to entry the Moralis admin space. There, you’ll wish to go to the “Web3 APIs” web page and replica your API key:
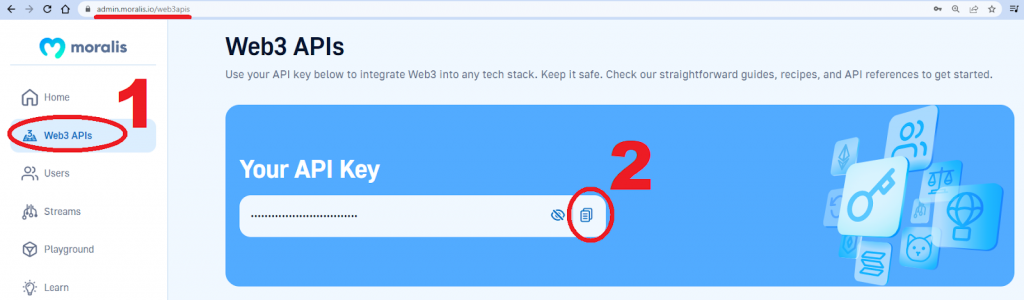
Then, return to VSC and paste the above-copied key into your “.env” file below the MORALIS_KEY variable.
Create a Webhook URL
When working with the Moralis Streams API, you could present a webhook URL. When constructing for manufacturing, this may be your dapp URL. Nonetheless, when creating dapps on testnets and localhosts, it’s essential to generate a webhook URL. Luckily, you are able to do that simply with ngrok. Simply open a brand new terminal and run the next command:
npx ngrok http 3000
The terminal will return a URL deal with that you must use as a webhook within the “stream.js” script:
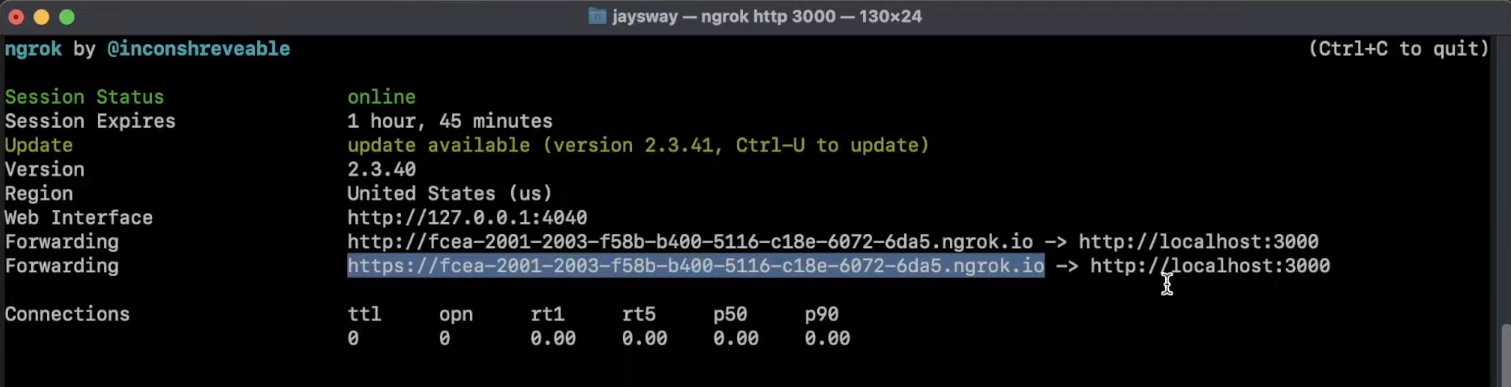
You now have all the things able to populate the “stream.js” file.
Create an ERC-20 Switch-Detecting Web3 Stream
On the prime of the “stream.js” script, you must import Moralis and its EvmChain utils and dotenv:
const Moralis = require(“moralis”).default;
const { EvmChain } = require(“@moralisweb3/common-evm-utils”);
require(“dotenv”).config();
Subsequent, it’s essential to initialize Moralis utilizing your Web3 API key with the Moralis.begin technique:
Moralis.begin({
apiKey: course of.env.MORALIS_KEY,
});
Good Contract ABI
As you in all probability know, every ERC-20 token belongs to a wise contract. The latter is deployed on the time of token creation and handles the token transfers, possession, and different guidelines. Herein, we’ll concentrate on the LINK token on the Mumbai testnet. Consequently, it’s essential to add that contract’s ABI (utility binary interface) below the erc20TransferAbi variable:
const erc20TransferAbi = [{“anonymous”:false,”inputs”:[{“indexed”:true,”internalType”:”address”,”name”:”from”,”type”:”address”},{“indexed”:true,”internalType”:”address”,”name”:”to”,”type”:”address”},{“indexed”:false,”internalType”:”uint256″,”name”:”value”,”type”:”uint256″}],”title”:”Switch”,”sort”:”occasion”}]
Should you had been to acquire the above ABI your self, you’d want to make use of PolygonScan (Mumbai). In fact, when working with different chains, it’s essential to use the related chain’s block explorer. Luckily, all EVM-compatible chains use comparable explorer layouts. So, as soon as on the good contracts web page, it’s essential to choose the “Contract” tab:
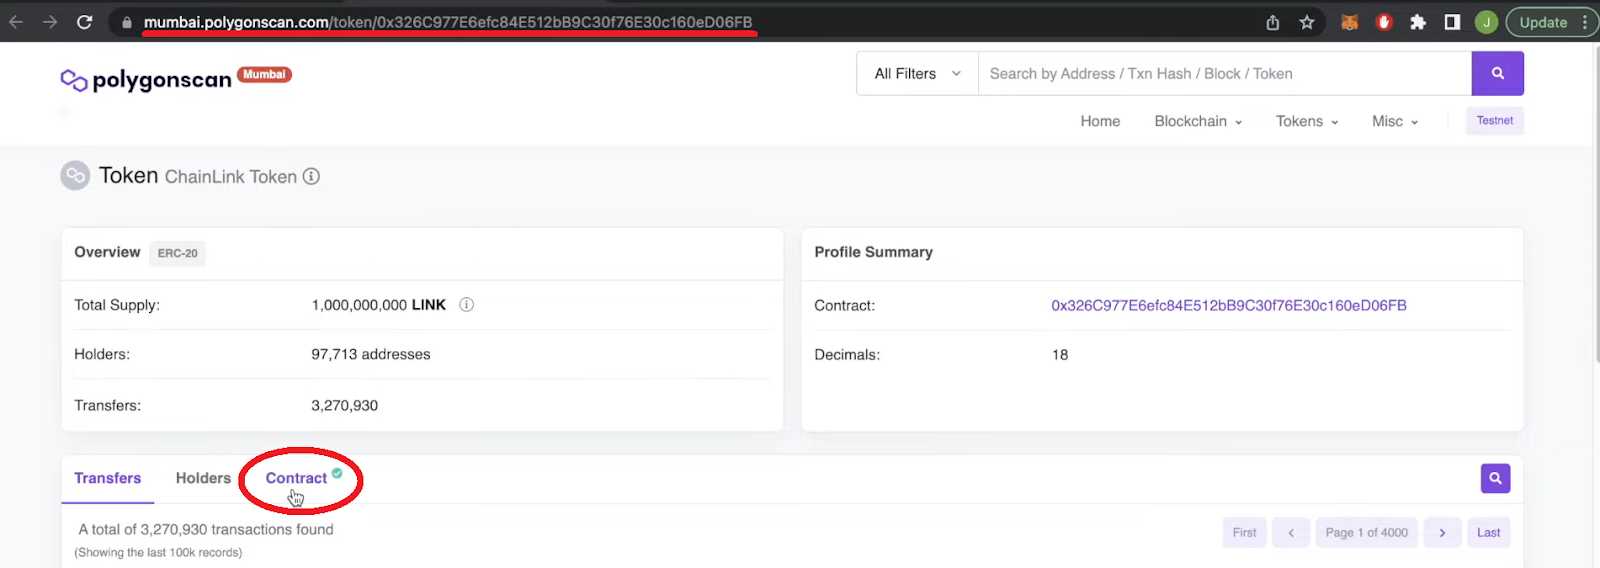
Then, you simply scroll down a bit, and you must see “Contract ABI”:

Because the above screenshot signifies, you should utilize your browser’s search choice to find a selected occasion. For this tutorial, you wish to concentrate on the Switch occasion.
One other beauty of the Streams API is which you could create all kinds of filters. That approach, you may focus solely on particular on-chain occasions. For instance, be happy so as to add the next filter. The latter focuses on transactions of a couple of and fewer than two LINK tokens:
const erc20Filter = {
“and”: [
{ “gt”: [“value”, “1000000000000000000”] },
{ “lt”: [“value”, “2000000000000000000”] },
],
};
Observe: The above filter serves the upcoming demonstration, and it helps us filter out different LINK transfers. It’s additionally price noting that ERC-20 tokens use 18 decimal locations.
Making a streams Perform
With the token contract ABI and filter in place, it’s time to lastly create a stream that detects LINK transfers. As such, it’s essential to create a streams async perform and outline the essential choices. These embody chain, description, tag, abi, topic0, includeContractLogs, and webhookUrl. Nonetheless, to implement the getNativeBalances choice as offered within the intro and the above-defined filter, you additionally have to outline superior choices:
async perform streams(){
const choices = {
chains: [EvmChain.MUMBAI],
description: “Discovering MATIC Whales Shopping for LINK Tokens”,
tag: “linkTransfers”,
abi: erc20TransferAbi,
topic0: [“Transfer(address,address,uint256)”],
includeContractLogs: true,
webhookUrl: “your webhook url”,
advancedOptions: [
{
topic0: “Transfer(address,address,uint256)”,
filter: erc20Filter
}
],
getNativeBalances: [
{
selectors: [“$to”],
sort: ‘erc20transfer’
}
]
}
const newStream = await Moralis.Streams.add(choices)
console.log(“Stream — Created”)
const {id} = newStream.toJSON();
const deal with = “0x326C977E6efc84E512bB9C30f76E30c160eD06FB”;
await Moralis.Streams.addAddress({deal with, id})
console.log(“ERC20 Contract to Observe — Added”)
}
streams()
The superior getNativeBalances choice is the important thing that fetches native real-time pockets stability at any time when a LINK switch that matches your filter takes place. For extra particulars about this superior choice, take a look at the “Get Native Balances” documentation web page.
To make the above traces of code work, you could additionally exchange your webhook url along with your ngrok URL. Don’t forget so as to add the /webhook endpoint on the finish, like so:

Right here’s an summary of the remainder of the above portion of the “stream.js” script:
Moralis.Streams.add – Provides the above-defined choices to a brand new stream. console.log(“Stream — Created”) – Console-logs Stream — Created.const {id} = newStream.toJSON(); – Reconstructs the brand new stream’s ID.deal with – Variable that holds the LINK good contract deal with.await Moralis.Streams.addAddress({deal with, id}) – Provides the good contract deal with to your stream.
Observe: In case you are utilizing the Moralis Enterprise or Enterprise account, you should utilize a single stream to concentrate on a number of token addresses. In that case, you’d want so as to add allAddresses: true amongst your stream’s choices:

Run and Take a look at Your Backend Dapp
Preserve your “index.js” script that’s powering your webhook working:

Open a brand new terminal and ensure to cd into the “newStream” folder. Then, run the “stream.js” script with the next command:
node stream.js
Right here’s what you must see in your new terminal:

Now that you’ve each of your scripts working, you should utilize your “webhook” terminal to see the outcome as you execute some check transfers of LINK. With the above filter in thoughts, be sure to ship a couple of and fewer than two LINK tokens.
To check your dapp, additionally, you will wish to get your MetaMask pockets prepared. Thus, add the Mumbai community to your MetaMask and join it to that testnet. Then, prime your pockets with some free MATIC and free LINK, which you will get from a vetted Polygon Mumbai faucet. With that stated, right here’s a screenshot that demonstrates the gist of our real-time pockets stability fetching backend dapp demo:
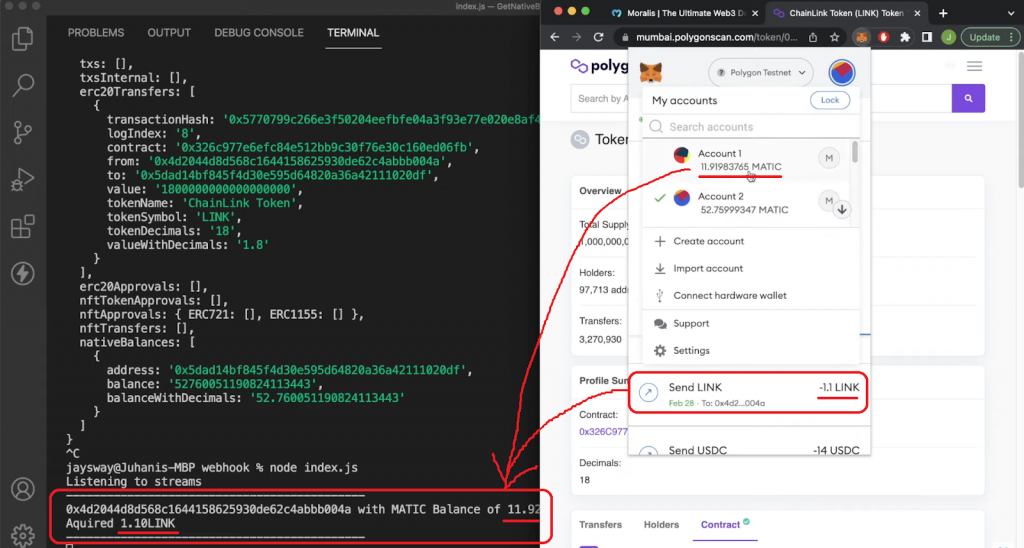
As you may see within the above screenshot, the second we ship the quantity of LINK that matches our filter from one in every of our accounts to a different, our stream detects this switch. Then, “index.js” immediately console-logs the quantity of this switch in addition to the recipient’s real-time pockets stability of MATIC.
Why is Actual-Time Pockets Stability Necessary?
Except for creating crypto wallets and portfolio trackers, Moralis Streams allow you to create all kinds of alerts based mostly on stay on-chain actions. Whale alerts are an incredible instance, which you’ll be able to study extra about in our “Twitter Bot for Crypto” tutorial.
Plus, take into account that the Moralis Streams API is just a part of this Web3 supplier’s arsenal. There’s additionally the Moralis Web3 Auth API, making the implementation of Web3 authentication a breeze. As well as, with the Web3 Information API set, you may question parsed on-chain knowledge throughout all of the main chains. What’s extra, you get to implement all this utilizing your legacy programming abilities and concise snippets of code.

Methods to Get Actual-Time Crypto Pockets Stability Updates – Abstract
On this article, you discovered the best way to use the Moralis Streams API to detect token transfers and a real-time pockets stability on the identical time. You now know that that is attainable because of the getNativeBalances stream choice. The latter can be utilized with various kinds of selectors and on-chain occasions. Whereas at present’s tutorial targeted on the Mumbai testnet and LINK token transfers, you may apply the identical ideas to different main chains and tokens. Should you go for a Moralis Enterprise or Enterprise account, you may even take heed to all token addresses in a single stream by setting the allAddresses choice to true.
We urge you to make use of the above ideas to create your individual Web3 streams for various occasions. That approach, you’ll correctly grasp the highly effective getNativeBalances function. Nonetheless, be happy to discover different blockchain improvement subjects and tutorials that await you on the Moralis YouTube channel and Moralis weblog. For instance, you may comply with our lead and construct a Polygon portfolio dapp or create a blockchain explorer.
If you want to future-proof your Web3 profession, be sure to take a look at Moralis Academy. There, you can begin with the Crypto for Learners course. Or, when you already possess stable crypto fundamentals, why not take a look at the Ethereum Good Contract Programming course? When you’ve finalized that course, we suggest trying out Good Contract Programming 201, which is a sophisticated Solidity course, good for anybody wanting a profession as a wise contract developer! Should you resolve to deal with that superior course, you’re going to get the possibility to construct a DEX (decentralized trade) on the Ethereum community!
[ad_2]
Source link


