
[ad_1]
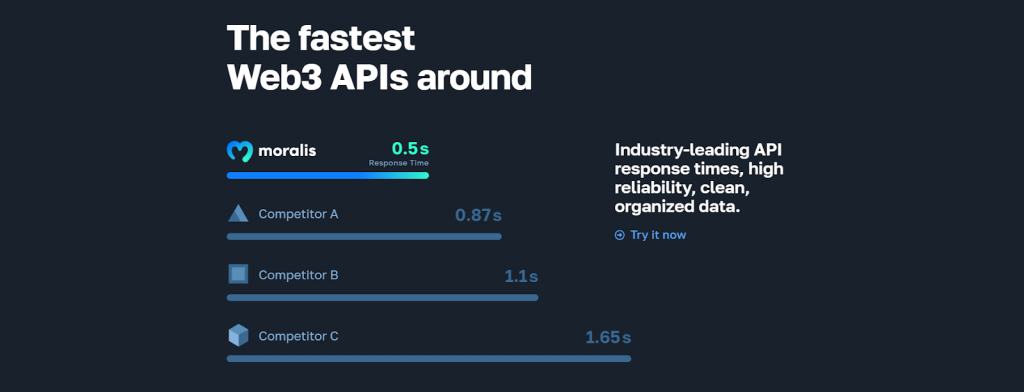
Due to the facility of the Web3 Knowledge API from Moralis, you possibly can simply construct a block explorer for Ethereum and different fashionable EVM-compatible chains. All it takes is your JavaScript proficiency and correct implementation of varied endpoints. Listed here are the 2 Web3 API endpoints that cowl the first block explorer options for the backend:
const response = await Moralis.EvmApi.token.getTokenPrice(choices); getWalletTransactions: const response = await Moralis.EvmApi.transaction.getWalletTransactions(choices);
To construct a block explorer utilizing the above two strategies, you simply have to initialize Moralis together with your personal Web3 API key:
Moralis.begin({
apiKey: MORALIS_API_KEY,
})
For those who’ve labored with Moralis earlier than, you most likely know precisely the right way to implement the above code snippets. Nevertheless, if that is your first rodeo with the quickest enterprise-grade Web3 APIs, you might want some extra steering. In that case, be certain that to tackle the next tutorial and construct a block explorer with NextJS and NodeJS. Within the tutorial, we’ll additionally present you the right way to acquire your Web3 API key. That stated, create your free Moralis account and comply with our lead!
Overview
In at present’s article, you’ll have a chance to create your personal occasion of a easy Etherscan clone. Now, to maintain issues easy, the clone focuses on fairly fundamental options, similar to displaying ETH value and transaction particulars for a pockets handle a person needs to discover. As well as, to make the method even less complicated for you, you’ll get to clone our code that awaits you on the “etherscan-search-clone” GitHub repo web page. With that in thoughts, it shouldn’t take you greater than ten minutes to construct a block explorer following our lead. Beneath the tutorial, you can even get the fundamentals beneath your belt by studying what a block explorer is.

Tutorial: Construct an Etherscan-Like Block Explorer
Word: You may entry the whole code for this block explorer undertaking on GitHub.
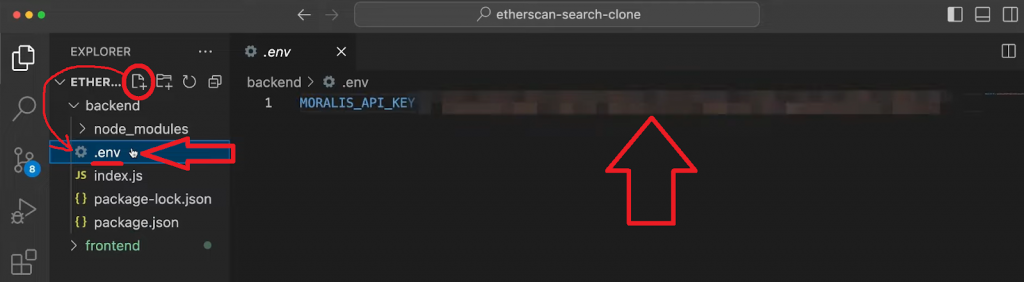
After cloning our code, open your “etherscan-search-clone” listing in Visible Studio Code (VSC). Inside that listing, you’ll see the “backend” and the “frontend” folders. First, deal with the backend folder, the place you must see the “package deal.json”, “package-lock.json”, and “index.js” recordsdata. The latter holds the important strains of code to construct a block explorer’s backend performance. Nevertheless, basically, all scripts collectively kind a NodeJS dapp. Additionally, to make the scripts operate accurately, you could set up all of the required dependencies (CORS, dotenv, Categorical, and Moralis). To do that, you possibly can cd into the “backend” folder and run the npm set up command.
You additionally have to create a “.env” file and populate it together with your Web3 API key:
So, to get your Web3 API key, you first have to log in to your Moralis account. The free plan is all it’s good to full this tutorial and begin using the facility of Moralis. Nevertheless, should you and your crew need to scale your undertaking, we encourage you to go along with both the Professional, Enterprise, or Enterprise plan:

As soon as inside your Moralis admin space, choose the “Web3 APIs” tab from the facet menu and use the “copy” icon:

Together with your API key in place, it’s time you discover the backend “index.js” script extra intently.

Backend Code Walkthrough
On the high of the “index.js” file, our backend requires Categorical and defines native port 5001. That is additionally the place the script requires Moralis, CORS, and dotenv:
const categorical = require(“categorical”);
const app = categorical();
const port = 5001;
const Moralis = require(“moralis”).default;
const cors = require(“cors”);
require(“dotenv”).config({ path: “.env” });
Subsequent, the code instructs the app to make use of CORS, Categorical JSON, and acquire the Web3 API key from the “.env” file:
app.use(cors());
app.use(categorical.json());
const MORALIS_API_KEY = course of.env.MORALIS_API_KEY;
The backend script makes use of your API key on the backside, the place it initializes Moralis with the next strains of code:
Moralis.begin({
apiKey: MORALIS_API_KEY,
}).then(() => {
app.hear(port, () => {
console.log(`Listening for API Calls`);
});
});
Concerning the backend portion to fetch blockchain information, the 2 strategies offered within the intro do the trick. To implement these strategies accurately, we should create two endpoints: /getethprice and /handle. The previous will use getTokenPrice to fetch the reside ETH value, whereas the latter will use getWalletTransactions to question all transactions for any handle customers enter on the frontend. So, listed below are the strains of code fetching the reside ETH value:
app.get(“/getethprice”, async (req, res) => {
strive {
const response = await Moralis.EvmApi.token.getTokenPrice({
handle: “0xc02aaa39b223fe8d0a0e5c4f27ead9083c756cc2”,
chain: “0x1”,
});
return res.standing(200).json(response);
} catch (e) {
console.log(`Somthing went fallacious ${e}`);
return res.standing(400).json();
}
});
Wanting on the strains of code above, you possibly can see that the tactic makes use of Ethereum’s sensible contract handle and chain ID (within the HEX format) as parameters. Plus, the code sends the response to the frontend consumer and logs potential errors.
As for the pockets transactions, the next snippet of code does all of the heavy lifting:
app.get(“/handle”, async (req, res) => {
strive {
const { question } = req;
const chain = “0x1”;
const response = await Moralis.EvmApi.transaction.getWalletTransactions({
handle: question.handle,
chain,
});
return res.standing(200).json(response);
} catch (e) {
console.log(`One thing went fallacious ${e}`);
return res.standing(400).json();
}
});
This methodology additionally takes in two parameters: handle and chain. Nevertheless, whereas the chain stays the identical as we need to deal with Ethereum, the handle should come from the search subject on the frontend.

Frontend Code Walkthrough
Now that you just perceive how the backend of our Etherscan-like dapp works, it’s time to deal with the frontend. So, to construct a block explorer with a legacy programming language, you should utilize NextJS. Apart from the styling scripts (which we received’t deal with on this tutorial), the “frontend” folder is basically a NextJS dapp. The latter makes use of Second.js and Axios dependencies you could set up earlier than shifting ahead. Apart from the frontend “index.js” script, the “header.js”, “search.js”, and “searchResults.js” elements cowl the gist of frontend functionalities. Therefore, let’s undergo the core features of those scripts.
The “index.js” Script
On the backside of “index.js” for the frontend, you possibly can see the way it renders the Header and SearchComp elements:
import Head from “subsequent/head”;
import types from “@/types/House.module.css”;
import Header from “../elements/header.js”;
import SearchComp from “../elements/search.js”;
export default operate House() {
return (
<>
<Head>
<title>Etherscan Search</title>
<meta identify=”description” content material=”Generated by create subsequent app” />
<meta identify=”viewport” content material=”width=device-width, initial-scale=1″ />
<hyperlink rel=”icon” href=”https://moralis.io/favicon.ico” />
</Head>
<part className={types.principal}>
<Header />
<SearchComp />
</part>
</>
);
}
The Header Element
Amongst different not-so-important issues, the header element is the place we show the reside ETH value obtained on the backend. Now, to take action correctly, the “header.js” script makes use of the Header operate, the place Axios fetches the on-chain information from our backend Categorical server:
export default operate Header() {
const [ethPrice, setEthPrice] = useState(“”);
useEffect(() => {
const getEthPrice = async () => {
const response = await axios.get(`http://localhost:5001/getethprice`, {});
setEthPrice(response.information.usdPrice);
};
getEthPrice();
});
return (
<part className={types.header}>
<part className={types.topHeader}>
ETH Worth:{” “}
<span className={types.blueText}>${Quantity(ethPrice).toFixed(2)}</span>
</part>
Word: The remainder of the code contained in the return a part of the Header operate focuses on displaying different menu objects (on the high). Nevertheless, for the sake of this tutorial, these menu objects will not be lively:

The Search Element
This element permits customers to enter any handle to view on-chain transactions. For those who have a look at the return a part of the “search.js” script, you possibly can see the H3 title, “The Ethereum Blockchain Explorer”, an enter subject, and a button that triggers the search:
return (
<part className={types.searchContainer}>
<part className={types.searchSection}>
<h3>The Ethereum Blockchain Explorer</h3>
<part className={types.input_section}>
<enter
className={types.inputField}
onChange={changeHandler}
/>
<button className={types.btn} onClick={handleSearch}>
The changeHandler operate extracts the worth from the enter subject and shops it beneath the setSearchInput state variable:
const changeHandler = (e) => {
setSearchInput(e.goal.worth);
};
One other operate, handleSearch, prompts when customers click on on the “search” button. This operate makes use of Axios to supply the backend with an handle to fetch transactions. Then, this operate receives the response from the backend server and shops the small print beneath the setResult state variable, which is an array. Lastly, this operate makes use of the setShowResults state variable, which is a boolean set to false by default. As soon as we get the outcomes, this variable adjustments to true and, in flip, the frontend shows the outcomes:
const handleSearch = async () => {
doc.querySelector(“#inputField”).worth = “”;
const response = await axios.get(`http://localhost:5001/handle`, {
params: { handle: searchInput },
});
setResult(response.information.outcome);
setShowResult(true);
};
As soon as setShowResults is about to true, the next line of code from the return portion of the “search.js” script renders the SearchResults element:
{showResult && <SearchResults outcome={{ outcome, searchInput }} />}
So, as for the “searchResults.js” script, the latter takes outcome and the searchInput parameters as props and neatly shows the transaction particulars. You may see how we neatly mimicked Etherscan within the demo beneath.
Remaining Construct of Our Block Explorer
Utilizing our scripts and following alongside within the above walkthroughs, you must now have constructed a block explorer with out breaking a sweat. Additionally, should you’ve put in all of the required dependencies and run the backend and frontend parts of your dapp, you must have the ability to take your Etherscan clone for a spin. So, by visiting “localhost:3000“, you get to work together with the frontend consumer:

Because the above screenshot signifies, we urge you to seek for any Web3 pockets handle. For instance, these are the outcomes for Vitalik’s (founding father of Ethereum) handle:
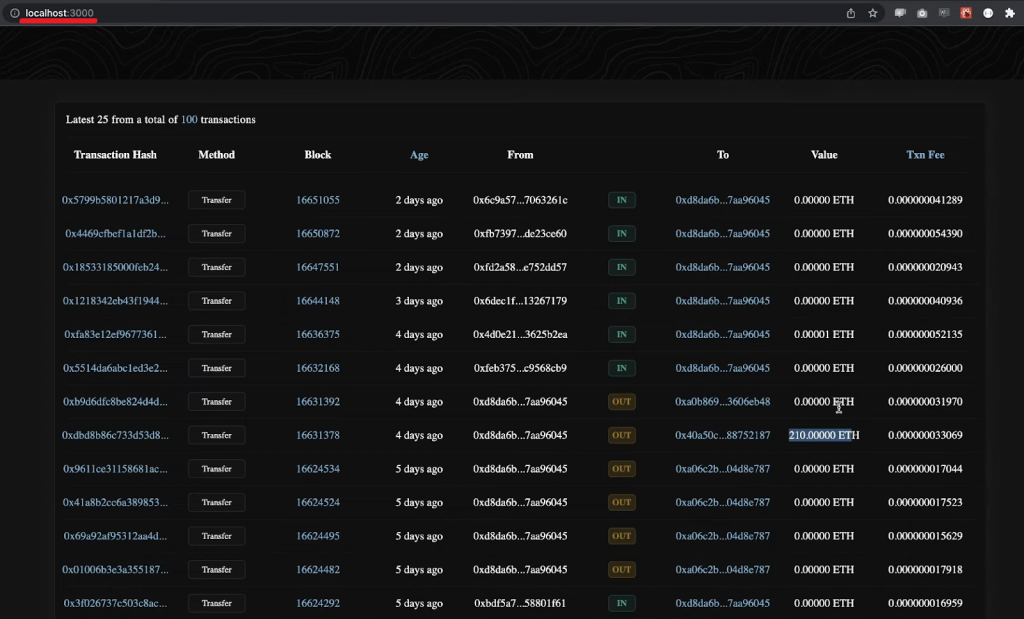
Wanting on the above screenshot, you possibly can see that we neatly displayed the small print of transactions in a really comparable method as Etherscan does:

What’s a Block Explorer?
A block explorer, also referred to as a blockchain explorer, is a particular internet software that permits guests to discover on-chain information for the blockchain it serves. This implies everybody with web entry can discover the publicly obtainable particulars of Web3 wallets, sensible contracts, transactions, and extra. A few of the hottest block explorers embody Etherscan for Ethereum, BscScan for BNB Chain, PolygonScan for Polygon, Snowtrace for Avalanche, FTMScan for Fantom, and Arbiscan for Arbitrum. These instruments will be sensible for exploring on-chain actions, viewing varied portfolios, checking the validity of transactions, and rather more.

Advantages of Block Explorers
Listed here are some advantages of utilizing a block explorer:
Transparency – Block explorers present a clear view of the blockchain community. Customers can view all of the transactions and monitor their standing. This permits customers to confirm the integrity of the blockchain and be sure that all transactions are legit.Safety – An explorer ensures the safety of the blockchain community by permitting customers to trace transactions and detect any suspicious exercise.Effectivity – Block explorers present a quick and environment friendly solution to search the blockchain community. Customers can rapidly seek for particular transactions or addresses and get detailed details about them. This will save customers loads of effort and time in comparison with manually looking via the blockchain.Analytics – Block explorers provide highly effective analytics instruments that enable customers to realize insights into the blockchain community. Customers can analyze transaction information, monitor traits, and determine patterns within the blockchain. This may help customers make higher choices and optimize their blockchain methods.Accessibility – As talked about beforehand, block explorers can be found to anybody with an web connection. As such, it makes it simple for customers to entry and discover the blockchain community. Furthermore, this promotes better transparency and accessibility within the blockchain ecosystem.
Specialised Blockchain Explorers
Apart from the aforementioned block explorers, there are various others, together with block explorers for non-EVM-compatible chains, similar to Solana and Aptos. Primarily, each chain has its official block explorer. Nevertheless, whereas these explorers are typically fairly highly effective, they provide many choices that may be complicated and “excessive” for a lot of customers. Plus, they don’t provide a fantastic UX. That is one more reason why it is sensible to construct a block explorer that can finest serve your focused demographics.
A terrific instance is our in-house dapp: Moralis Cash, which we constructed to make sure firsthand that our Web3 APIs carry out flawlessly. Moralis Cash is a superb token explorer for Ethereum and different main EVM-compatible chains, that includes superior search filters to simply discover hidden gems (similar to altcoins with promising potential). Make sure that to test it out – new options will roll out shortly!

As you possibly can see within the above screenshot, identical to different block explorers, Moralis Cash is open to everybody. Plus, it allows you to join your wallets (e.g., MetaMask) to discover your personal portfolios in a user-friendly method. As soon as related, you additionally get to gather magic beans each day. To seek out out concerning the energy of Moralis beans, keep tuned!
How you can Construct a Block Explorer – Abstract
In at present’s article, you had an opportunity to construct a block explorer that mimics a few of Etherscan’s functionalities. Since we supplied you with our scripts, you can have your personal Etherscan clone prepared in minutes. Primarily, you simply needed to clone our code, acquire your Web3 API key and retailer it right into a “.env” file, set up the required dependencies, and run the backend and frontend. You additionally realized what block explorers are and why it is sensible to construct specialised blockchain explorers. Moreover, you additionally found Moralis Cash!
Now that you’ve got your Moralis Web3 API key, you can also make probably the most out of Moralis’ toolbox and take your initiatives to the subsequent stage. For instance, you possibly can deal with constructing a block explorer to serve a selected goal. Nevertheless, there are numerous different dapps you possibly can create with this powerhouse in your nook. You may construct a Web3 pockets, a portfolio tracker, or an NFT market. No matter sort of dapp you resolve to create, the Moralis docs will enable you get to the end line. For those who want some concepts or inspiration, use our Web3 growth video tutorials that await you on the Moralis Web3 YouTube channel.
Additionally, don’t neglect to broaden your blockchain horizons by exploring our crypto weblog. A few of our newest articles deal with explaining the right way to get blockchain information for varied networks (e.g., the Arbitrum testnet), develop DeFi initiatives, use an Oasis testnet faucet or Goerli faucet, what scaling options for Ethereum are, and rather more. By exploring these articles and taking over our tutorials, you possibly can develop into a Web3 developer free of charge utilizing your legacy programming abilities. Be part of the Web3 revolution at present!
[ad_2]
Source link


