
[ad_1]
Arbitrum is one in every of many scaling options for Ethereum. Because of its optimistic rollup protocol, transactions grow to be cheaper and sooner. Moreover, tasks constructed on Arbitrum inherit Ethereum-level safety. So, if you wish to construct a DEX that includes quick transactions and low fuel charges, then growing an Arbitrum DEX is the way in which to go!
Now, constructing a DEX on any chain could sound like a frightening job. Nonetheless, the method turns into fairly simple with the precise steering and instruments. Additionally, since Arbitrum is an Ethereum L2 (layer-2) resolution, builders can use the identical instruments as when constructing on prime of Ethereum or different EVM-compatible chains. As such, the Web3 APIs from Moralis, NodeJS, React, wagmi, and the 1inch aggregator mean you can construct an Arbitrum DEX in lower than two hours. Right here’s how simple it’s to make use of Moralis when constructing on Arbitrum:
Moralis.begin({
apiKey: course of.env.MORALIS_KEY,
defaultEvmApiChain: EvmChain.ARBITRUM
})
Nonetheless, earlier than you deploy your DEX or different dapps (decentralized functions) on the Arbitrum mainnet, you’ll need to take a look at issues on a testnet. For that function, you’ll want a dependable Arbitrum Goerli faucet.
In case you are keen to start out the sensible portion of this text, create your free Moralis account and use the upcoming tutorial! Nonetheless, for those who want some inspiration first, be sure that to take a look at our listing of decentralized exchanges on Arbitrum beneath.

Record of Decentralized Exchanges on Arbitrum
The next listing of Arbitrum DEX examples can function an awesome supply of inspiration. So, be at liberty to go to these exchanges and take them for a spin.

These are the preferred DEXs and DeFi protocols on Arbitrum:
Uniswap was the primary Ethereum-based trade. It continues to supply ERC-20 token swaps by way of liquidity swimming pools. Other than Ethereum, Uniswap helps Polygon, Optimism, and Arbitrum. Sushi is one other respected DEX that helps a number of networks and permits customers to swap an unlimited vary of crypto. Sushi helps the identical 4 networks as Uniswap.Slingshot is a well-liked token-swapping protocol with 0% charges. It helps the next networks: Arbitrum, Polygon, BNB Chain, and Optimism.Mycelium focuses completely on Arbitrum – it’s a native decentralized buying and selling protocol on this L2.Shell Protocol is a wrapping protocol that serves as a DeFi improvement toolkit on Arbitrum.

Dolomite is a margin buying and selling protocol primarily based on Arbitrum. FS focuses on decentralizing buying and selling and investing in tokens, tokenized shares or NFTs, and startup fairness. Other than Arbitrum, it helps BNB Chain, Ethereum, Optimism, and Polygon. Cap is an Arbitrum-based decentralized leverage buying and selling protocol with low charges and an honest buying and selling quantity.Dexible is a multi-chain decentralized buying and selling protocol. It helps Arbitrum, Avalanche, BNB Chain, Ethereum, Optimism, and Polygon.UniDex is an aggregator that permits merchants to get the most effective price available on the market. It additionally helps perpetual leverage buying and selling of crypto, foreign exchange, ETFs, and extra.

Different Arbitrum DEX platforms and protocols embody:
MES Protocol Piper FinanceBebopSquid1inch
Observe: Arbitrum is a comparatively new community. Thus, there are present and new tasks including help for the community day by day. As such, the above listing of Arbitrum DEX options is way from full.

Arbitrum DEX Tutorial
You’ve gotten two choices if you wish to discover ways to construct your individual Arbitrum DEX. You need to use the video beneath specializing in the Ethereum chain and implement the minor changes to focus on Arbitrum. Or, chances are you’ll use the upcoming sections as your information. In both case, you’ll have to finish the next 5 phases to get to the end line:
Arrange your projectBuild a DEX headerBuild a token swap pageImplement backend DEX functionalityIntegrate the 1inch aggregator for Arbitrum
Observe: Transferring ahead, be sure that to make use of our GitHub repository. That manner, you gained’t have to start out from scratch. Plus, you don’t want to fret about styling recordsdata, and you may dedicate your most consideration to DEX functionalities.
Preliminary Undertaking Setup
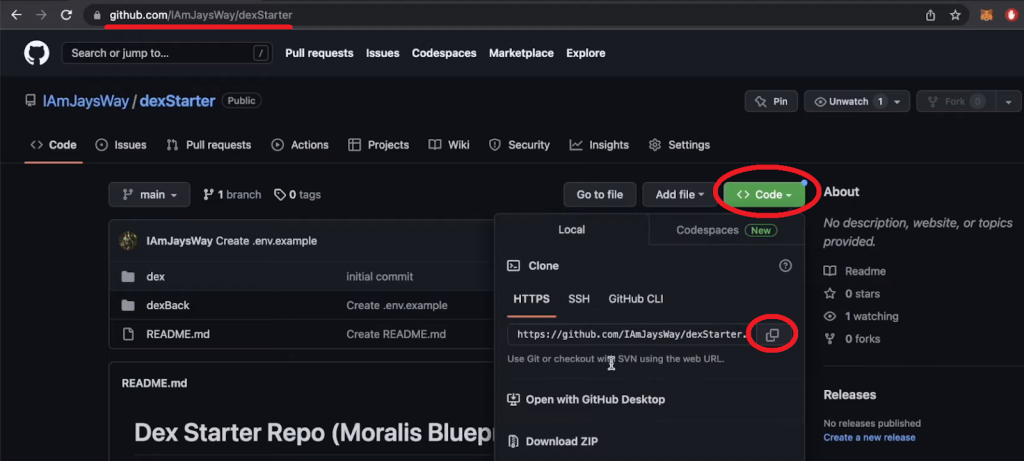
Begin by cloning our code as demonstrated within the above screenshot. Subsequent, use Visible Studio Code (VSC), open a brand new mission, and clone the code through the use of the above-copied URL with the next command:
git clone https://github.com/IAmJaysWay/dexStarter
Then, cd into the “dexStarter” folder:
cd dexStarter
Inside the “dexStarter” folder, you’ll see the “dex” and “dexBack” folders. The previous accommodates the frontend elements for this mission, whereas the latter holds the backend scripts. With our starter code, you might be beginning with easy React (frontend) and NodeJS (backend) apps. To make our template scripts perform correctly, you need to set up the required dependencies. Thus, cd into the frontend folder, the place it’s worthwhile to run the next command:
npm set up
After putting in the dependencies, run your React app with this command:
npm run begin
Then, chances are you’ll go to “localhost:3000” to see the preliminary state of your Arbitrum DEX frontend:

Construct a DEX Header
From the “dex/src” folder, open “App.js”. Inside that script, import the Header.js element:
import Header from “./elements/Header”;
Then, you’ll be capable of add the Header element to the App perform:
perform App() {
return (
<div className=”App”>
<Header />
</div>
)
}
Transferring on, give attention to the “Header.js” script, positioned within the “dex/src/elements” listing. On the prime of that script, import the emblem and chain picture:
import Brand from “../moralis-logo.svg”;
import Arbitrum from “../arbitrum.svg”;
Observe: Our template scripts give attention to the Ethereum chain. So, you’ll have to search out an Arbitrum icon (arbitrum.svg) and add it to the “dex/src” listing. Then, as you proceed, change the related traces of code accordingly.
You additionally need to tweak the Header perform so it can show the emblem, menu choices, the related chain, and the “Join” button:
perform Header(props) {
const {deal with, isConnected, join} = props;
return (
<header>
<div className=”leftH”>
<img src={Brand} alt=”brand” className=”brand” />
<div className=”headerItem”>Swap</div>
<div className=”headerItem”>Tokens</div>
</div>
<div className=”rightH”>
<div className=”headerItem”>
<img src={Arbitrum} alt=”eth” className=”arbitrum” />
Arbitrum
</div>
<div className=”connectButton” onClick={join}>
{isConnected ? (deal with.slice(0,4) +”…” +deal with.slice(38)) : “Join”}
</div>
</div>
</header>
);
}
With the above traces of code in place, your DEX header ought to look as follows (with “Arbitrum” as an alternative of “Ethereum”):

At this level, the “Swap” and “Tokens” choices above are inactive. So, it’s worthwhile to activate them by returning to the “App.js” file and importing the Swap and Tokens elements and Routes:
import Swap from “./elements/Swap”;
import Tokens from “./elements/Tokens”;
import { Routes, Route } from “react-router-dom”;
As well as, contained in the Header div, add the mainWindow div with correct route paths:
<Header join={join} isConnected={isConnected} deal with={deal with} />
<div className=”mainWindow”>
<Routes>
<Route path=”/” factor={<Swap isConnected={isConnected} deal with={deal with} />} />
<Route path=”/tokens” factor={<Tokens />} />
</Routes>
</div>
You additionally have to tweak the “Header.js” script. Begin by importing Hyperlink on the prime (beneath the present imports):
import { Hyperlink } from “react-router-dom”;
Then, wrap root and tokens path hyperlinks across the Swap and Tokens divs:
<Hyperlink to=”/” className=”hyperlink”>
<div className=”headerItem”>Swap</div>
</Hyperlink>
<Hyperlink to=”/tokens” className=”hyperlink”>
<div className=”headerItem”>Tokens</div>
</Hyperlink>
Because of this, your frontend ought to now allow you to change between the “Swap” and “Tokens” pages:

Construct a Token Swap Web page
To cowl the fronted DEX performance, you need to use the Ant Design UI framework elements. Open the “Swap.js” script and add the next traces of code:
import React, { useState, useEffect } from “react”;
import { Enter, Popover, Radio, Modal, message } from “antd”;
import {
ArrowDownOutlined,
DownOutlined,
SettingOutlined,
} from “@ant-design/icons”;
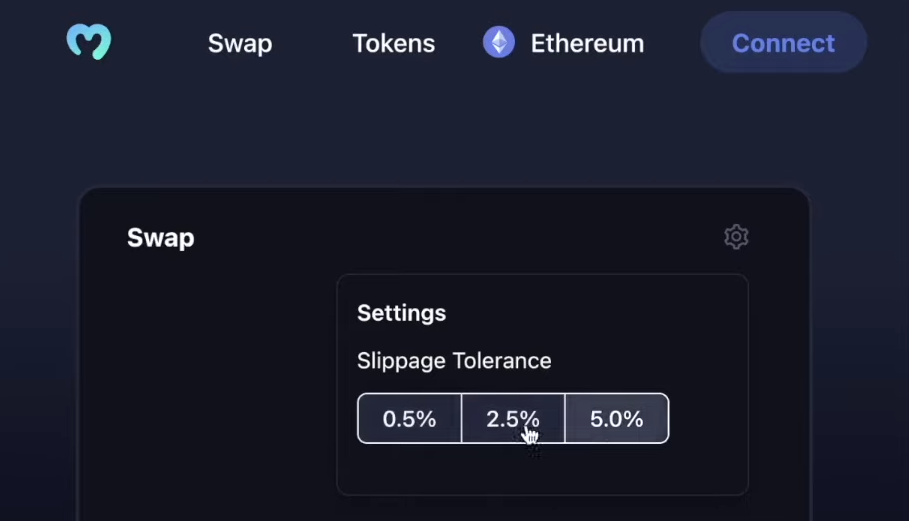
Then, you need to create a tradeBox div on the “Swap” web page. The next traces of code additionally cowl a slippage setting choice:
perform Swap() {
const [slippage, setSlippage] = useState(2.5);
perform handleSlippageChange(e) {
setSlippage(e.goal.worth);
}
const settings = (
<>
<div>Slippage Tolerance</div>
<div>
<Radio.Group worth={slippage} onChange={handleSlippageChange}>
<Radio.Button worth={0.5}>0.5%</Radio.Button>
<Radio.Button worth={2.5}>2.5%</Radio.Button>
<Radio.Button worth={5}>5.0%</Radio.Button>
</Radio.Group>
</div>
</>
);
return (
<div className=”tradeBox”>
<div className=”tradeBoxHeader”>
<h4>Swap</h4>
<Popover
content material={settings}
title=”Settings”
set off=”click on”
placement=”bottomRight”
>
<SettingOutlined className=”cog” />
</Popover>
</div>
</div>
</>
);
}
The next screenshot signifies the progress of your DEX’s frontend:
Add Token Enter Fields
So as to allow your Arbitrum DEX customers to pick out the tokens they need to swap, it’s worthwhile to add the suitable enter fields. Therefore, it’s worthwhile to refocus on the tradeBox div and create the inputs div (beneath the tradeBoxHeader div):
<div className=”inputs”>
<Enter
placeholder=”0″
worth={tokenOneAmount}
onChange={changeAmount}
disabled={!costs}
/>
<Enter placeholder=”0″ worth={tokenTwoAmount} disabled={true} />
<div className=”switchButton” onClick={switchTokens}>
<ArrowDownOutlined className=”switchArrow” />
</div>
<div className=”assetOne” onClick={() => openModal(1)}>
<img src={tokenOne.img} alt=”assetOneLogo” className=”assetLogo” />
{tokenOne.ticker}
<DownOutlined />
</div>
<div className=”assetTwo” onClick={() => openModal(2)}>
<img src={tokenTwo.img} alt=”assetOneLogo” className=”assetLogo” />
{tokenTwo.ticker}
<DownOutlined />
</div>
Plus, beneath the above Slippage state variable, it’s worthwhile to add the suitable state variables to your enter fields:
const [tokenOneAmount, setTokenOneAmount] = useState(null);
const [tokenTwoAmount, setTokenTwoAmount] = useState(null);
const [tokenOne, setTokenOne] = useState(tokenList[0]);
const [tokenTwo, setTokenTwo] = useState(tokenList[1]);
const [isOpen, setIsOpen] = useState(false);
const [changeToken, setChangeToken] = useState(1);
You additionally want so as to add the next features, which is able to deal with the altering of token quantities and the switching of “from/to”. So, add the next traces of code beneath the handleSlippageChange perform:
perform changeAmount(e) {
setTokenOneAmount(e.goal.worth);
if(e.goal.worth && costs){
setTokenTwoAmount((e.goal.worth * costs.ratio).toFixed(2))
}else{
setTokenTwoAmount(null);
}
}
perform switchTokens() {
setPrices(null);
setTokenOneAmount(null);
setTokenTwoAmount(null);
const one = tokenOne;
const two = tokenTwo;
setTokenOne(two);
setTokenTwo(one);
fetchPrices(two.deal with, one.deal with);
}
To supply customers the choice to pick out tokens, we ready “tokenList.json”. The latter contained an array of tokens: their tickers, icons, names, addresses, and decimals.
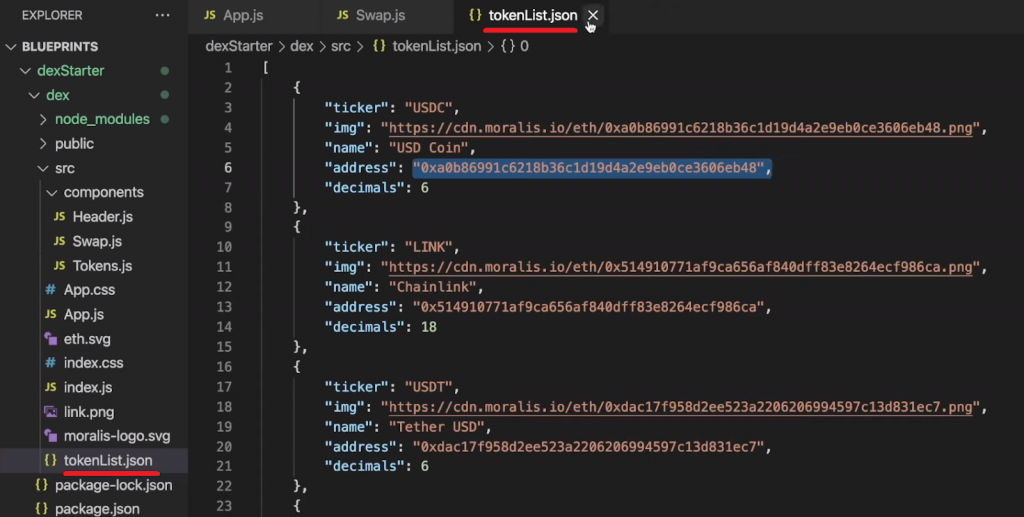
Observe: Our listing of tokens was designed to help the Ethereum chain. Nonetheless, because the token worth in USD is identical throughout the chains, you should utilize the identical listing for Arbitrum.
So as to make the most of our token listing, import “tokenList.json” into your “Swap.js” script:
import tokenList from “../tokenList.json”;
Add Token Choice Modals
The above-presented inputs div accommodates two openModal features. As such, it’s worthwhile to tweak your script in order that these features will work correctly. To that finish, add the next traces of code inside return, simply above the tradeBox div:
return (
<>
{contextHolder}
<Modal
open={isOpen}
footer={null}
onCancel={() => setIsOpen(false)}
title=”Choose a token”
>
<div className=”modalContent”>
{tokenList?.map((e, i) => {
return (
<div
className=”tokenChoice”
key={i}
onClick={() => modifyToken(i)}
>
<img src={e.img} alt={e.ticker} className=”tokenLogo” />
<div className=”tokenChoiceNames”>
<div className=”tokenName”>{e.identify}</div>
<div className=”tokenTicker”>{e.ticker}</div>
</div>
</div>
);
})}
</div>
</Modal>
Moreover, additionally add the openModal and modifyToken features beneath the present features:
perform openModal(asset) {
setChangeToken(asset);
setIsOpen(true);
}
perform modifyToken(i){
setPrices(null);
setTokenOneAmount(null);
setTokenTwoAmount(null);
if (changeToken === 1) {
setTokenOne(tokenList[i]);
fetchPrices(tokenList[i].deal with, tokenTwo.deal with)
} else {
setTokenTwo(tokenList[i]);
fetchPrices(tokenOne.deal with, tokenList[i].deal with)
}
setIsOpen(false);
}
Lastly, add the next line of code beneath the inputs div to implement the “Swap” button:
<div className=”swapButton” disabled= !isConnected onClick={fetchDexSwap}>Swap</div>
With all the aforementioned tweaks in place, your Arbitrum DEX frontend must be prepared:

Implement Backend Arbitrum DEX Performance
Should you keep in mind, the “dexBack” folder holds the backend scripts. Amongst others, that is the place the place you could find the “.env.instance” file, the place you’ll retailer your Web3 API key. So, in case you haven’t carried out so but, create your free Moralis account and entry your admin space. Then, copy your API key from the “Web3 APIs” web page:

Along with your Web3 API key contained in the “.env.instance” file, additionally rename the file to “.env”. Then, open a brand new terminal and cd into the “dexStarter” folder after which into “dexBack”. As soon as inside your backed listing, you might be prepared to put in all of the backend dependencies by working the next command:
npm set up
Subsequent, you need to focus in your backend’s “index.js” script to implement the Moralis getTokenPrice endpoint.
Observe: We encourage you to make use of the Moralis Web3 documentation to discover the “Get ERC-20 token worth” endpoint.
The next app.get perform (contained in the backend’s “index.js” script) ensures that the /tokenPrice endpoint fetches token costs in USD:
app.get(“/tokenPrice”, async (req, res) => {
const {question} = req;
const responseOne = await Moralis.EvmApi.token.getTokenPrice({
deal with: question.addressOne
})
const responseTwo = await Moralis.EvmApi.token.getTokenPrice({
deal with: question.addressTwo
})
const usdPrices = {
tokenOne: responseOne.uncooked.usdPrice,
tokenTwo: responseTwo.uncooked.usdPrice,
ratio: responseOne.uncooked.usdPrice/responseTwo.uncooked.usdPrice
}
return res.standing(200).json(usdPrices);
});
After updating and saving your “index.js” file, enter “node index.js” into your backend terminal to run your backend.
Observe: You possibly can entry the ultimate backend “index.js” file on our “dexFinal” GitHub repo web page:

Should you have a look at the underside of the “index.js” script, you may see the Moralis.begin perform. The latter initializes Moralis for Ethereum by default. As famous above, since we’re solely fetching token costs, that are the identical on all chains, we will give attention to Ethereum though we’re constructing an Arbitrum DEX. Nonetheless, for those who had been to create a token listing that makes use of Arbitrum token addresses, you’d have to initialize Moralis for the Arbitrum community:
Moralis.begin({
apiKey: course of.env.MORALIS_KEY,
defaultEvmApiChain: EvmChain.ARBITRUM
})
Frontend-Backend Communication
One other vital side of constructing a DEX is getting token costs out of your backend (which we lined above) to your frontend. To implement this communication, return to your “Swap.js” script. There, import Axios slightly below the present imports:
import axios from “axios”;
To correctly implement the communication between the frontend and backend, you additionally want so as to add the next state variable:
const [prices, setPrices] = useState(null);
Plus, be sure that so as to add the next fetchPrices async perform and its corresponding useEffect beneath the modifyToken perform:
async perform fetchPrices(one, two){
const res = await axios.get(`http://localhost:3001/tokenPrice`, {
params: {addressOne: one, addressTwo: two}
})
setPrices(res.information)
}
useEffect(()=>{
fetchPrices(tokenList[0].deal with, tokenList[1].deal with)
}, [])
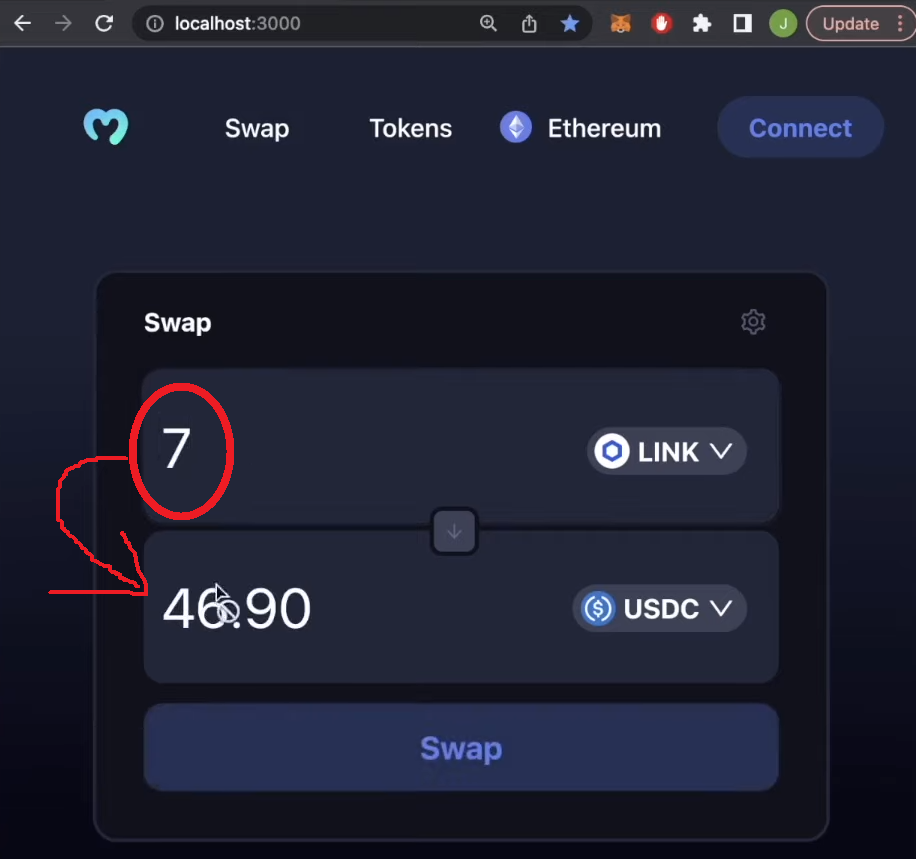
With the above tweaks in place, the DEX is ready to acquire token costs and calculate their ratios. Moreover, utilizing this information, your frontend can routinely populate the quantity of the token pair:
Web3 Authentication – Connecting Web3 Wallets
It’s time to activate the “Join” button in your DEX’s header. To implement Web3 authentication the simple manner, you should utilize the wagmi library. So, open your frontend’s “index.js” file, which is positioned contained in the “dex/src” listing. On the prime of that script, import the next elements and a public supplier from wagmi:
import { configureChains, arbitrum, WagmiConfig, createClient } from “wagmi”;
import { publicProvider } from “wagmi/suppliers/public”;
Subsequent, configure the chains, and create a shopper by including the next snippets of code beneath the imports:
const { supplier, webSocketProvider } = configureChains(
[arbitrum],
[publicProvider()]
);
const shopper = createClient({
autoConnect: true,
supplier,
webSocketProvider,
});
Nonetheless, don’t overlook to wrap BrowserRouter with WagmiConfig:
<React.StrictMode>
<WagmiConfig shopper={shopper}>
<BrowserRouter>
<App />
</BrowserRouter>
</WagmiConfig>
</React.StrictMode>
Observe: You possibly can entry the ultimate frontend “index.js” script on the “dexFinal” GitHub repo. Nonetheless, take into account that the “index.js” script on the frontend focuses on the Ethereum chain.
You could additionally tweak your “App.js” script to make sure the “Join” button works correctly. Once more, first, import the wagmi elements and MetaMask connector beneath:
import { useConnect, useAccount } from “wagmi”;
import { MetaMaskConnector } from “wagmi/connectors/metaMask”;
Then, give attention to the App perform with a purpose to destructure the deal with and join a brand new consumer. So, above return, add the next traces of code:
const { deal with, isConnected } = useAccount();
const { join } = useConnect({
connector: new MetaMaskConnector(),
});
Observe: In case you desire a extra detailed code walkthrough relating to the “Join” button, watch the above video, beginning at 57:25.
When you implement the above traces of code, you’ll be capable of use the “Join” button to hook up with your Arbitrum DEX together with your MetaMask pockets:

Observe: Be certain that so as to add the Arbitrum community to MetaMask:

Combine the 1inch Aggregator for Arbitrum
The best technique to implement the precise DEX functionalities is to make use of the 1inch aggregator. The latter helps most EVM-compatible chains, together with Arbitrum. Should you want to discover ways to use the 1inch docs to acquire the proper API endpoint, make the most of the above video (1:04:14) however as an alternative give attention to the Arbitrum chain:

Nonetheless, you may merely reopen the “Swap.js” script and add the next snippets of code to finalize your Arbitrum DEX:
Import the next hooks from wagmi:import { useSendTransaction, useWaitForTransaction } from “wagmi”; Tweak your Swap perform by including props:perform Swap(props) {
const { deal with, isConnected } = props; Add a brand new state variable (beneath the present state variables) to retailer transaction particulars and watch for a transaction to undergo: const [txDetails, setTxDetails] = useState({
to:null,
information: null,
worth: null,
});
const {information, sendTransaction} = useSendTransaction({
request: {
from: deal with,
to: String(txDetails.to),
information: String(txDetails.information),
worth: String(txDetails.worth),
}
})
const { isLoading, isSuccess } = useWaitForTransaction({
hash: information?.hash,
}) The fetchDexSwap async perform that it’s worthwhile to add beneath fetchPrices accommodates the required 1inch API hyperlinks for the Arbitrum chain (chain ID: 42161). You possibly can fetch these API hyperlinks from the “Swagger” part of the 1inch documentation. Plus, it’s worthwhile to create your token listing with Arbitrum addresses for the next traces of code to perform correctly: async perform fetchDexSwap(){
const allowance = await axios.get(`https://api.1inch.io/v5.0/42161/approve/allowance?tokenAddress=${tokenOne.deal with}&walletAddress=${deal with}`)
if(allowance.information.allowance === “0”){
const approve = await axios.get(`https://api.1inch.io/v5.0/42161/approve/transaction?tokenAddress=${tokenOne.deal with}`)
setTxDetails(approve.information);
console.log(“not authorised”)
return
}
const tx = await axios.get(`https://api.1inch.io/v5.0/42161/swap?fromTokenAddress=${tokenOne.deal with}&toTokenAddress=${tokenTwo.deal with}&quantity=${tokenOneAmount.padEnd(tokenOne.decimals+tokenOneAmount.size, ‘0’)}&fromAddress=${deal with}&slippage=${slippage}`)
let decimals = Quantity(`1E${tokenTwo.decimals}`)
setTokenTwoAmount((Quantity(tx.information.toTokenAmount)/decimals).toFixed(2));
setTxDetails(tx.information.tx);
} Add an extra three useEffect features below the present useEffect perform to cowl transaction particulars and pending transactions: useEffect(()=>{
if(txDetails.to && isConnected){
sendTransaction();
}
}, [txDetails])
useEffect(()=>{
messageApi.destroy();
if(isLoading){
messageApi.open({
kind: ‘loading’,
content material: ‘Transaction is Pending…’,
length: 0,
})
}
},[isLoading])
useEffect(()=>{
messageApi.destroy();
if(isSuccess){
messageApi.open({
kind: ‘success’,
content material: ‘Transaction Profitable’,
length: 1.5,
})
}else if(txDetails.to){
messageApi.open({
kind: ‘error’,
content material: ‘Transaction Failed’,
length: 1.50,
})
}
},[isSuccess])
Arbitrum DEX – Record of Arbitrum DEXs and Methods to Construct One – Abstract
In at the moment’s article, you first discovered in regards to the main DEXs and DeFi protocols on Arbitrum. Then, you had an opportunity to mix the facility of a type of DEX aggregators (1inch) and Moralis to construct your individual Arbitrum DEX. Utilizing our template scripts, you had been in a position to focus completely on DEX functionalities by making a swap token web page. Alongside the way in which, you additionally discovered the way to acquire your Web3 API and the way to goal the Arbitrum community with Moralis. So, not solely do you now know the way to create an Arbitrum DEX, however you’re additionally prepared to start out constructing different killer dapps on Arbitrum.

Probably the greatest issues about Moralis is that you just don’t have to restrict your self to a single chain. Because of the cross-chain interoperability of Moralis, you may simply create multi-chain dapps. When you have your individual concepts, use the Moralis docs that can assist you take advantage of out of this enterprise-grade Web3 API toolset. Nonetheless, for those who want further inspiration or concept sparks, be sure that to take a look at our Web3 improvement video tutorials that await you on the Moralis YouTube channel or discover the Moralis weblog. Among the newest matters there give attention to information availability in blockchains, an Oasis testnet faucet, the way to use ChatGPT to mint an NFT, the way to mint NFTs on Aptos, and far more.
[ad_2]
Source link


